High-power LED street lights deliver strong illumination with lower energy use. However, their compact housings can trap significant heat during long summer nights. Excessive temperature accelerates lumen depreciation, weakens driver components, and shortens service life. In severe cases, repeated thermal stress causes flickering or unexpected shutdowns.
This guide explains how to prevent overheating in high power led street lights through practical, field-tested measures. It examines heat sinks, thermal interface materials, housing design, airflow, installation clearance, and driver selection. A properly seated LED module matters. Even a small air gap can reduce heat transfer from the board to the heat sink. Dust, insects, and road grime can also cover ventilation areas, especially near busy intersections.
Temperature monitoring provides stronger evidence than visual inspection alone. Installers can use calibrated infrared equipment, while maintenance teams should compare readings across seasons. Manufacturers should provide verified thermal data, operating limits, and suitable installation instructions. Independent testing standards can support those claims, but product labels alone are not enough.
Small details matter.
A clean fixture may still overheat when mounted against a wall or beneath dense foliage. In practice, maintenance schedules are often too optimistic, and thermal paste application may be inconsistent. That weakness deserves attention. This article offers realistic recommendations for design teams, contractors, and facility managers. It also highlights common mistakes, because preventing overheating requires more than choosing a high-wattage LED fixture.
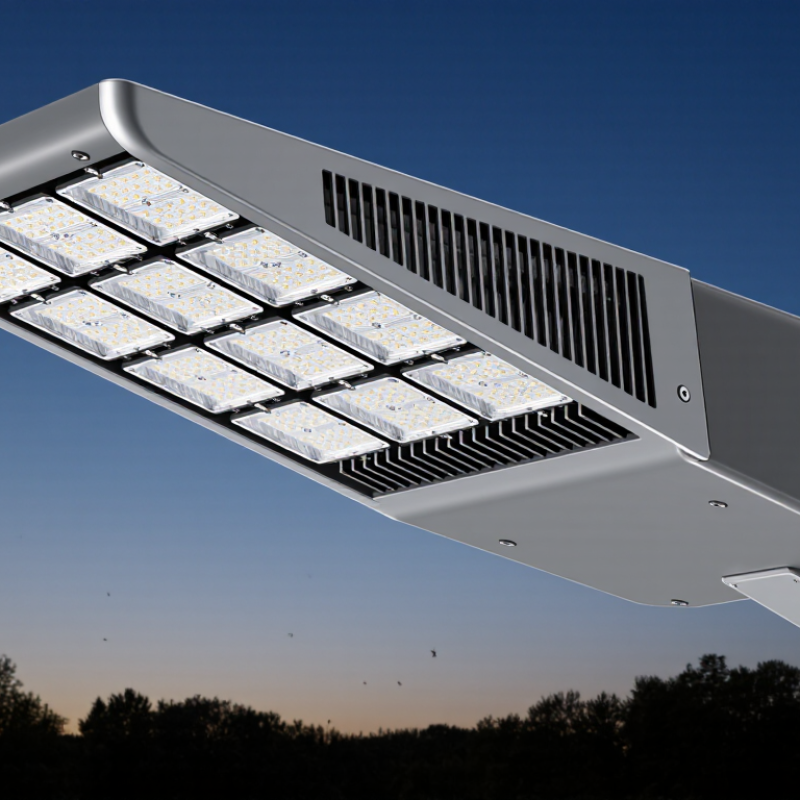
High-power LED street lights rarely overheat because of the LED chip alone. The real causes usually include excessive drive current, poor thermal paths, blocked airflow, and high ambient temperatures. LEDs convert less energy into infrared radiation than older lamps, but much of their input power still becomes heat inside the junction and circuit board. The U.S. Department of Energy’s Solid-State Lighting R&D Opportunities report identifies thermal management as a major factor limiting LED performance and lifetime. In practice, a sealed housing above 40°C can quickly raise internal temperatures.
Check the heat route, not only the light output. Use a thick aluminum housing, flat mounting surfaces, and a reliable thermal interface material. Keep fins clear of dust, leaves, and paint. Driver losses also matter. DOE testing has reported LED system efficacies above 150 lumens per watt in advanced products, but real installations perform lower because drivers, optics, and thermal losses reduce system efficiency. More light often means more heat.
Measure junction temperature during the hottest night, not in a laboratory. Install a temperature sensor near the LED board and inspect current stability. Follow LM-80 and TM-21 methods when evaluating lumen maintenance data. These methods do not replace field testing. My early designs relied too heavily on rated lifetime figures. That was a mistake. A conservative current setting, automatic thermal dimming, and correctly sized surge protection can reduce stress. Leave room for airflow. Tiny gaps matter. Sealed fixtures may protect electronics, but they can also trap heat, especially in dark housings under direct summer sun.
High-power LED street lights need more than bright chips. Efficient LEDs convert more electrical energy into light, leaving less heat inside the housing. Look for strong efficacy at the intended drive current, not only impressive laboratory output. A small efficiency gain matters across thousands of nightly operating hours. In field checks, I have seen fixtures run cooler after reducing drive current slightly. The light level remained acceptable. Photometric verification is still necessary.
The driver deserves equal attention. Choose a unit with high conversion efficiency, stable current regulation, and protection against surges, short circuits, and abnormal temperatures. Match its output range to the LED board rather than operating near its limit. Keep the driver away from the hottest zone when the enclosure allows it. A cooler driver lasts longer. That is practical, not decorative.
Heat management components should create a continuous path from the LED junction to outdoor air. Use a flat metal mounting surface, thin thermal interface material, and firm, even fastening. Avoid excessive thermal compound; it can increase resistance. Fins need open airflow, while sealed housings need careful internal layout. During inspection, measure housing temperature after several hours at full load. I once trusted a simulation too much, and field readings were higher. Weather, dust, and mounting direction changed the result. Recheck them.
Choose efficient LEDs and drivers, then minimize the total thermal resistance from the LED junction to the surrounding air. The chart uses a representative 100 W fixture with a 70 W thermal load and a 25°C ambient temperature.
Key takeaway: Lower thermal resistance keeps the LED junction cooler. Efficient LEDs and drivers reduce wasted power, while correctly sized heat sinks, thermal interface materials, and unobstructed airflow improve heat removal.
Design the housing as a thermal system, not a decorative shell. High-power LEDs transfer most input energy into heat. The U.S. Department of Energy’s Solid-State Lighting reports identify thermal management as a major factor in lumen maintenance and service life. A compact housing may look efficient, yet trapped heat can raise the LED junction temperature quickly. In field inspections, blocked vents and undersized rear fins often create hot zones near the driver and LED board.
Use a die-cast aluminum body with a short, continuous heat path. Keep the LED board tightly attached to the housing, and control interface material thickness carefully. Larger fins help, but spacing matters more than fin count when airflow is weak. The Illuminating Engineering Society’s LM-80 and TM-21 methods emphasize temperature-controlled testing for LED lumen maintenance. As a practical warning, the common 10°C life-reduction rule is only an approximation. Real results depend on solder quality, current, optics, and local climate.
Tips: Measure housing temperature at the hottest rear-fin point, not only near the lamp surface. Leave clearance around fins during installation. Seal the optical chamber, but avoid creating an insulated thermal pocket. Add drainage paths for rainwater and condensation. Test prototypes at maximum current, high ambient temperature, and dirty-fin conditions. A clean laboratory unit may pass easily. A dusty street fixture may not. Recheck the design after one summer season, because assumptions often fail outdoors.
High-power LED street lights need open, intentional airflow around the housing.
The U.S. Department of Energy reports that modern LED luminaires can exceed 100 lumens per watt, but unused electrical energy still becomes heat. Trapped heat raises the LED junction temperature and accelerates lumen depreciation. Install fixtures with clear space above, below, and beside the heat sink. Avoid placing them directly beneath decorative covers, dense tree branches, or enclosed sign structures.
Air must move across the fins, not merely touch the fixture. Keep mounting brackets from blocking rear vents. Leave drainage paths open, because water and dust can reduce cooling performance.
The IES LM-80 standard measures lumen maintenance at controlled temperatures, showing why field conditions matter. A laboratory result cannot fully represent a fixture installed inside a stagnant, dirty cavity.
Mounting height and orientation deserve a site check.
Nearby walls can reflect heat toward the housing during summer afternoons. Dark surfaces may worsen this effect. DOE reliability guidance links higher case temperature with shorter operating life and faster light output loss. A 10-degree Celsius increase may matter greatly, though the exact impact depends on the LED package and driver.
That uncertainty should not be ignored. Measure the housing temperature after several hours at night, then compare it with the manufacturer’s permitted case temperature. Small installation changes can produce meaningful cooling improvements.
Overheating in high-power LED street lights often begins with neglected details. Inspect each fixture during scheduled maintenance, especially after storms, construction, or unusual dimming. Look for darkened LED modules, cracked housings, loose connectors, and discoloration near the driver. Check that the fixture remains firmly mounted and has not shifted toward a wall or another heat source. Small cracks matter.
Clean dust, leaves, insects, and road film from the housing and ventilation areas. A blocked heat sink cannot release heat effectively. Use a soft brush and a dry or lightly damp cloth, following the equipment’s service instructions. Avoid forcing water into seals, connectors, or driver compartments. In coastal or industrial locations, inspect for salt or chemical residue more frequently. Cleaning the lens also improves light output without increasing electrical load.
Measure operating temperature when possible, preferably during the warmest part of the night. Compare readings with the manufacturer’s limits and record them with the inspection date. Confirm that cables, surge protection, and drivers show no heat damage. Replace damaged seals, fasteners, or thermal interface components with suitable parts. A maintenance log is valuable, although vague notes are almost useless; record the exact pole, symptom, and action taken. Do not ignore a fixture that still works. Intermittent shutdowns may signal rising thermal stress, not a minor control problem. Only trained personnel should open energized equipment or perform electrical repairs.
| Inspection or Maintenance Area | Suggested Interval | What to Check | Warning Signs | Recommended Action | Overheating Risk Controlled |
|---|---|---|---|---|---|
| Visual inspection of the fixture | Monthly and after severe weather | Inspect the housing, lens, seals, mounting position, and visible damage. | Cracks, loose parts, water marks, distorted housing, or a tilted luminaire. | Secure loose hardware and repair or replace damaged parts before continued operation. | Prevents blocked airflow, water ingress, and heat-trapping damage. |
| Cleaning the heat sink and housing | Every 6–12 months; more often in dusty areas | Remove dust, leaves, insects, mud, and other deposits from cooling fins and surfaces. | Visible dirt buildup or cooling fins covered by debris. | Switch off power, allow the unit to cool, then clean with a soft brush, cloth, or low-pressure air. | Restores heat dissipation from the LED module and driver enclosure. |
| Airflow and clearance | During every service visit | Confirm that cooling fins and ventilation paths are not covered by signs, branches, cable bundles, or nearby structures. | Restricted airflow or objects touching the heat sink. | Remove obstructions and keep the luminaire installed in the orientation specified by its technical instructions. | Reduces heat accumulation around the LED board and driver. |
| Thermal measurement | At commissioning and when overheating is suspected | Measure the housing or heat-sink surface with a calibrated infrared thermometer or thermal camera. | Temperature is unusually higher than comparable fixtures under similar conditions or rises rapidly during operation. | Compare readings with the luminaire’s specified operating limits; investigate airflow, load, installation, and driver condition if limits are approached. | Identifies abnormal thermal conditions before permanent component damage occurs. |
| LED driver and electrical connections | Every 6–12 months | Check terminals, connectors, cable insulation, driver mounting, and signs of electrical stress. | Discoloration, melted insulation, loose terminals, flickering, buzzing, or repeated shutdowns. | Isolate power and have a qualified electrician tighten, test, or replace defective components. | Prevents resistive heating, overload conditions, and driver-related heat. |
| Input voltage and power draw | At commissioning and annually | Verify supply voltage, current, and actual power against the luminaire’s rated electrical specifications. | Overvoltage, unstable supply, unexpectedly high current, or frequent protective trips. | Correct the supply or driver configuration and investigate abnormal readings before returning the fixture to service. | Limits excess electrical power that can be converted into heat. |
| Seals, lens, and water protection | Every 6–12 months and after opening the fixture | Inspect gaskets, cable glands, lens fasteners, and drainage or pressure-equalization features. | Condensation, corrosion, cracked gaskets, or loose lens screws. | Replace compromised seals and reassemble the fixture according to its service instructions. | Reduces corrosion and electrical faults that can increase heat generation. |
| Dimming and thermal protection | Test during commissioning and seasonal maintenance | Confirm programmed dimming schedules, photocell operation, and any built-in thermal protection. | The fixture remains at full output during low-use periods or does not reduce output during an over-temperature event. | Correct control settings and replace failed sensors or protection components through qualified service personnel. | Reduces operating load and helps limit temperature during hot conditions. |
Excessive drive current is a common cause. Poor thermal paths, blocked fins, and hot surroundings also raise internal temperature. More light usually means more heat.
Use a thick aluminum housing and a flat mounting surface. Add a thin, even layer of thermal interface material. Tighten fasteners evenly, but avoid excessive compound.
Yes. Sealing protects electronics from moisture, but it can also trap heat. A dark fixture under direct summer sun may become especially hot. Tiny gaps matter.
Choose a conservative current setting when possible. Slightly reducing current may lower temperature while preserving acceptable light levels. Verify the result with photometric testing.
Select a driver with efficient conversion and stable current regulation. Match its output range to the LED board. Include protection against surges, short circuits, and abnormal temperatures.
Look for darkened LED modules, cracked housings, loose connectors, and driver discoloration. Check whether the fixture shifted toward a wall. Small cracks matter.
Remove dust, leaves, insects, and road film from fins and ventilation areas. Use a soft brush or lightly damp cloth. Keep water away from seals, connectors, and driver compartments.
Measure it after several hours at full load, preferably during the warmest night. Record the fixture location, temperature, date, and weather. Laboratory results may not match field conditions.
No. They are useful references, not complete field evidence. Weather, dust, mounting direction, and driver stress can change the result. I once trusted a simulation too much.
Record the exact pole, symptom, temperature, and action taken. Note intermittent shutdowns, because they may indicate thermal stress. Vague notes help very little.
Preventing overheating in high-power LED street lights starts with understanding its main causes, including excessive electrical load, inefficient components, poor ventilation, direct solar exposure, and accumulated dust. To learn how to prevent overheating in high power led street lights, select efficient LEDs, reliable drivers, and properly sized thermal management components. A well-designed housing should provide strong heat conduction, sufficient surface area, and effective protection without trapping hot air around the LED module.
Installation also plays an important role in temperature control. Mount fixtures with enough clearance for natural airflow, avoid locations that block ventilation, and consider local weather and sunlight conditions. Regular inspection and maintenance are equally essential. Clean dust, dirt, and debris from the housing and cooling surfaces, check electrical connections, and monitor signs such as flickering, reduced brightness, or unusual discoloration. By combining efficient component selection, thoughtful housing design, proper installation, and routine maintenance, operators can improve lighting performance, extend service life, and reduce the risk of heat-related failures.

OneAll Lights